Toyota Yaris: Light Bulbs / Replacing Exterior Light Bulbs
Headlights/Daytime running lights (With halogen headlights)
- Make sure the ignition is switched off, and the headlight switch is off.
- Lift the hood.
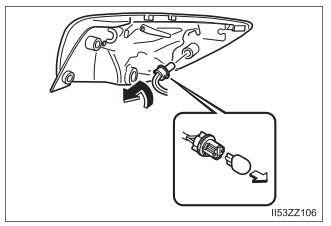
- Disconnect the connector
from the bulb.

- Detach the sealing cover
from the bulb.

- Retaining spring
- Sealing cover
- Unhook the bulb retaining spring.
- Swing the retaining spring out and away to free the headlight bulb.
- Carefully remove the headlight bulb from the socket by pulling it straight back.
- Replace the bulb.
- Install the new bulb in the reverse order of the removal procedure.
Front turn signal lights/Parking lights, Front side-marker lights
- Make sure the ignition is switched off, and the headlight switch is off.
- Lift the hood.
- Front turn signal lights/Parking lights: Remove the fuse block cover.

- Turn the socket and bulb assembly counterclockwise and remove it.
- Disconnect the bulb from the socket.
Front turn signal lights/Parking lights

Front side-marker lights

- Install the new bulb in the reverse order of the removal procedure.
Fog lights (if equipped)
- Make sure the ignition is switched off, and the fog light switch is off.
- Turn the screws counterclockwise and remove them.

- Pull the center of each retainers and remove them, and
then partially peel back the
front under cover.

- Removal
- Installation
- Disconnect the connector
from the unit by pressing the
tab on the connector with
your finger and pulling the
connector downward.

- Turn the socket and bulb
assembly to remove it. Carefully remove the bulb from its
socket in the reflector by
gently pulling it straight backward out of the socket.

- Install the new bulb in the reverse order of the removal procedure.
Rear turn signal lights, Brake lights/Taillights/Rear side-marker lights
4-Door
- Make sure the ignition is switched off, and the headlight switch is off.
- Remove the cover.

- Turn the socket and bulb assembly counterclockwise and remove it.
- Disconnect the bulb from the socket.
Rear turn signal lights:

Brake lights/Taillights/Rear sidemarker lights:

- Install the new bulb in the reverse order of the removal procedure.
- Insert the cover tabs and install the cover.
Verify that the cover is securely installed.
5-Door
- Make sure the ignition is switched off, and the headlight switch is off.
- Turn the bolts counterclockwise and remove them.

- Pull the unit rearward to
remove it.

- Turn the socket and bulb assembly counterclockwise and remove it.
- Disconnect the bulb from the socket.
Rear turn signal lights:

Brake lights/Taillights:

Rear side-marker lights:
- Install the new bulb in the reverse order of the removal procedure.
Reverse lights
4-Door
- Make sure the ignition is switched off, and the headlight switch is off.
- Pull the center of each plastic retainers and remove them.

- Removal
- Installation
- Remove the trunk lid trim.
- Disconnect the electrical
connector from the bulb by
pressing the tab on the connector with your finger and
pulling the connector.

- Turn the socket and bulb assembly counterclockwise and remove it.
- Disconnect the bulb from the
socket.

- Install the new bulb in the reverse order of the removal procedure.
5-Door
- Make sure the ignition is switched off, and the headlight switch is off.
- Pull the center of each plastic
retainer and remove the
retainers.

- Removal
- Installation
- Remove the trunk lid trim.
- Disconnect the connector from the socket.

- Turn the socket and bulb assembly counterclockwise and remove it.
- Disconnect the bulb from the
socket.

- Install the new bulb in the reverse order of the removal procedure.
License plate lights
4-Door
- Make sure the ignition is switched off, and the headlight switch is off.
- Pull the center of each plastic
retainers and remove them.

- Removal
- Installation
- Peel back the trunk lid trim.
- Turn the socket and bulb assembly counterclockwise and remove it.
- Disconnect the bulb from the
socket.

- Install the new bulb in the reverse order of the removal proce- dure.
5-Door
- Make sure the ignition is switched off, and the headlight switch is off.
- Wrap a flathead screwdriver with a soft cloth to prevent damage to the light unit.
- Insert a flathead screwdriver
into the position shown in the
figure and pull the light unit
outward.

- Disconnect the connector
from the bulb by pressing the
tab on the connector with
your finger and pulling the
connector.

- Turn the socket and bulb assembly counterclockwise and remove it.
- Disconnect the bulb from the
socket.

- Install the new bulb in the reverse order of the removal procedure.
Headlights/Daytime running lights (With LED headlights), Side turn signal lights (if equipped), High-mount brake light
The LED bulb cannot be replaced as a single unit because it is an integrated unit. The LED bulb has to be replaced with the unit. We recommend your Toyota dealer when the replacement is necessary.
Headlights/Daytime running lights
- To replace the bulb, contact your Toyota dealer.
- If the halogen bulb is accidentally touched, it should be cleaned with rubbing alcohol before being used.
- Use the protective cover and carton of the replacement bulb to dispose of the old bulb promptly out of the reach of children.
- When reinstalling the sealing cover, make sure it is fitted correctly.
 Light Bulbs
Front
With Halogen Headlights
Headlights (Low/High beam)/Daytime running lights
Front side-marker lights
Overhead lights/Map lights
Side turn signal lights (if equipped)
Front turn signal lights/Parking lights
Fog lights (if equipped)
With LED Headlights
Headlights (High beam)
Headlights (Low beam)
Front side-marker lights
Overhead lights/Map lights
Side turn signal lights (if equipped)
Front turn signal lights/Parking lights
Daytime running light/Parking light
Fog lights
Rear
4-Door
Trunk light
High-mount brake lights
License plate lights
Reverse lights
Rear turn signal lights
Brake lights/Taillights/Rear side-marker lights
5-Door
High-mount brake light
License plate lights
Reverse lights
Rear turn signal lights
Brake lights/Tail lights
Rear side-marker lights
Luggage compartment light
To replace the bulb, contact your Toyota dealer...
 Replacing Interior Light Bulbs
Overhead lights/Map lights
Wrap a small flathead screwdriver with a soft cloth to prevent damage to
the lens, and
then remove the lens by
carefully prying on the edge
of the lens with the flathead
screwdriver...
Other information:
Toyota Yaris XP210 (2020-2025) Reapir and Service Manual: Parts Location
P..
Toyota Yaris XP210 (2020-2025) Reapir and Service Manual: Control Module Performance Bank 1 Watchdog/Safety MCU Failure (P060747,P060787)
MONITOR DESCRIPTION The ECM continuously monitors its internal ICs and the monitor IC. If the monitor IC is abnormal, the ECM illuminates the MIL and stores DTC P060747. If an internal IC is abnormal, the ECM illuminates the MIL and stores DTC P060787...
Categories
- Manuals Home
- Toyota Yaris Owners Manual
- Toyota Yaris Service Manual
- Fuel Gauge
- How to use USB mode
- Starting the Engine
- New on site
- Most important about car
Turning the Engine Off
Stop the vehicle completely. Manual transaxle: Shift into neutral and set the parking brake.Automatic transaxle: Shift the selector lever to the P position and set the parking brake.
Press the push button start to turn off the engine. The ignition position is off.