Toyota Yaris: G16e-gts (engine Control) / Ignition Coil And Spark Plug
Components
COMPONENTS
ILLUSTRATION

| *1 | SPARK PLUG | *2 | IGNITION COIL ASSEMBLY |
 | N*m (kgf*cm, ft.*lbf): Specified torque | - | - |
Removal
REMOVAL
CAUTION / NOTICE / HINT
The necessary procedures (adjustment, calibration, initialization or registration) that must be performed after parts are removed and installed, or replaced during ignition coil assembly or spark plug removal/installation are shown below.
Necessary Procedures After Parts Removed/Installed/Replaced| Replaced Part or Performed Procedure | Necessary Procedure | Effect/Inoperative Function when Necessary Procedure not Performed | Link |
|---|---|---|---|
| Inspection after repair |
|
|
PROCEDURE
1. REMOVE IGNITION COIL ASSEMBLY
| (a) Disconnect the 3 ignition coil assembly connectors. |
|
(b) Remove the 3 bolts and 3 ignition coil assemblies from the cylinder head cover sub-assembly.
NOTICE:
If an ignition coil assembly has been struck or dropped, replace it.
2. REMOVE SPARK PLUG
Click here

Installation
INSTALLATION
CAUTION / NOTICE / HINT
PROCEDURE
1. INSTALL SPARK PLUG
Click here

2. INSTALL IGNITION COIL ASSEMBLY
HINT:
Perform "Inspection After Repair" after replacing an ignition coil assembly.
Click here

(a) Install the 3 ignition coil assemblies to the cylinder head cover sub-assembly with the 3 bolts.
Torque:
10 N·m {102 kgf·cm, 7 ft·lbf}
NOTICE:
If an ignition coil assembly has been struck or dropped, replace it.
HINT:
Install the same parts to their original positions.
(b) Connect the 3 ignition coil assembly connectors.
3. PERFORM INITIALIZATION
(a) Perform "Inspection After Repair" after replacing an ignition coil assembly or spark plug.
Click here

 Installation
INSTALLATION PROCEDURE 1. INSTALL ENGINE COOLANT TEMPERATURE SENSOR HINT: Perform "Inspection After Repair" after replacing the engine coolant temperature sensor...
Other information:
Toyota Yaris XP210 (2020-2025) Reapir and Service Manual: Check Mode Procedure
CHECK MODE PROCEDURE HINT: Compared to normal mode, check mode is more sensitive to malfunctions. Therefore, check mode can detect malfunctions that cannot be detected in normal mode. NOTICE: All of the stored DTCs and Freeze Frame Data are cleared if: 1) the ECM is changed from normal mode to check mode or vice versa; or 2) the ignition switch is turned from ON to ACC or off while in check mode...
Toyota Yaris XP210 (2020-2025) Reapir and Service Manual: Front Passenger Side Power Window does not Operate with Front Passenger Side Power Window Switch
DESCRIPTION When the ignition switch is ON, the power window regulator motor assembly (for front passenger door) is operated by the power window regulator switch assembly. The power window regulator motor assembly (for front passenger door) has motor, regulator, and ECU functions...
Categories
- Manuals Home
- Toyota Yaris Owners Manual
- Toyota Yaris Service Manual
- Auto Lock/Unlock Function
- How to use USB mode
- Fuel Gauge
- New on site
- Most important about car
Keys

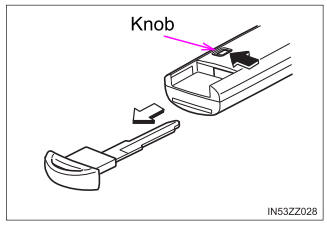
To use the auxiliary key, press the knob and pull out the auxiliary key from the smart key.


