Toyota Yaris: Rear Axle Carrier / Removal
REMOVAL
CAUTION / NOTICE / HINT
The necessary procedures (adjustment, calibration, initialization, or registration) that must be performed after parts are removed and installed, or replaced during rear axle carrier sub-assembly removal/ installation are shown below.
Necessary Procedure After Parts Removed/Installed/Replaced| Replacement Part or Procedure | Necessary Procedure | Effect/Inoperative when not Performed | Link |
|---|---|---|---|
| Front wheel alignment adjustment | ECU Data Initialization | Active torque split AWD system |
|
| Calibration |
|
|


HINT:
- Use the same procedure for the RH side and LH side.
- The following procedure is for the LH side.
PROCEDURE
1. REMOVE REAR WHEEL
Click here

2. REMOVE REAR AXLE SHAFT NUT
Click here

3. SEPARATE REAR DISC BRAKE CALIPER ASSEMBLY
Click here

4. REMOVE PARKING BRAKE SHOE ADJUSTING HOLE PLUG
Click here

5. REMOVE REAR DISC
Click here

6. DISCONNECT REAR SPEED SENSOR
Click here

7. REMOVE REAR AXLE HUB AND BEARING ASSEMBLY
Click here

8. REMOVE REAR BRAKE
| (a) Remove the nut and rear brake from the rear axle carrier sub-assembly. |
|

9. REMOVE FLEXIBLE HOSE BRACKET
| (a) Remove the bolt and flexible hose bracket from the rear axle carrier sub-assembly. |
|

10. REMOVE REAR STABILIZER LINK ASSEMBLY
Click here

11. REMOVE REAR COIL SPRING
Click here

12. REMOVE REAR LOWER COIL SPRING INSULATOR
Click here

13. REMOVE REAR NO. 1 SUSPENSION ARM ASSEMBLY
Click here

14. REMOVE REAR AXLE CARRIER SUB-ASSEMBLY
| (a) Loosen the 2 bolts of the rear trailing arm assembly. |
|

| (b) Loosen the nut of the rear shock absorber assembly. NOTICE: Hold the rear axle carrier pin while rotating the nut. |
|

| (c) Using a jack and a wooden block, support the rear axle carrier sub-assembly. NOTICE:
|
|

| (d) Loosen the bolt (A). NOTICE: Loosen the bolt with the nut secured. |
|

(e) Remove the 2 bolts and separate the rear trailing arm assembly from the rear axle carrier sub-assembly.
(f) Remove the nut and separate the rear shock absorber assembly from the rear axle carrier sub-assembly.
NOTICE:
Hold the rear axle carrier pin while rotating the nut.
(g) Remove the bolt (A), nut and rear axle carrier sub-assembly from the rear upper control arm assembly.
NOTICE:
Loosen the bolt with the nut secured.
 Components
COMPONENTS ILLUSTRATION
*1 REAR AXLE HUB AND BEARING ASSEMBLY *2 REAR AXLE SHAFT NUT *3 REAR DISC BRAKE CALIPER ASSEMBLY *4 REAR SPEED SENSOR *5 REAR FLEXIBLE HOSE *6 REAR DRIVE SHAFT ASSEMBLY *7 REAR BRAKE *8 REAR DISC *9 PARKING BRAKE SHOE ADJUSTING HOLE PLUG - -
Tightening torque for "Major areas involving basic vehicle performance such as moving/turning/stopping" : N*m (kgf*cm, ft...
 Installation
INSTALLATION CAUTION / NOTICE / HINT HINT:
Use the same procedure for the RH side and LH side.
The following procedure is for the LH side.
PROCEDURE 1...
Other information:
Toyota Yaris XP210 (2020-2025) Owner's Manual: Locking, Unlocking with Auxiliary Key
Turn the auxiliary key toward the front to lock, toward the back to unlock. Lock Unlock To lock All doors and the liftgate lock automatically when the driver’s door is locked using the auxiliary key. To unlock The driver’s door unlocks when the auxiliary key is turned briefly to the unlock position and then immediately returned to the center position...
Toyota Yaris XP210 (2020-2025) Reapir and Service Manual: Headup Display
ComponentsCOMPONENTS ILLUSTRATION *1 METER MIRROR SUB-ASSEMBLY *2 NO. 1 HEATER TO REGISTER DUCT SUB-ASSEMBLY RemovalREMOVAL CAUTION / NOTICE / HINT HINT: When the cable is disconnected/reconnected to the auxiliary battery terminal, systems temporarily stop operating...
Categories
- Manuals Home
- Toyota Yaris Owners Manual
- Toyota Yaris Service Manual
- To Set Speed
- Headlights
- Maintenance
- New on site
- Most important about car
Keys
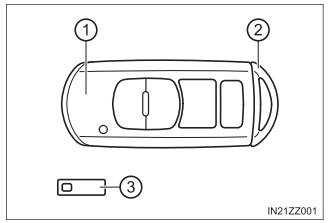
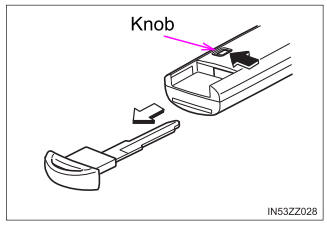
To use the auxiliary key, press the knob and pull out the auxiliary key from the smart key.