Toyota Yaris: Cylinder Head Gasket / Installation
INSTALLATION
CAUTION / NOTICE / HINT
NOTICE:
This procedure includes the installation of small-head bolts. Refer to Small-Head Bolts of Basic Repair Hint to identify the small-head bolts.
Click here

PROCEDURE
1. INSTALL CYLINDER HEAD GASKET
(a) Clean the cylinder block sub-assembly and cylinder head sub-assembly with solvent.
| (b) Place a new cylinder head gasket on the cylinder block sub-assembly with the Lot No. stamp facing upward. NOTICE: Make sure that the cylinder head gasket is installed in the correct orientation. |
|

2. INSTALL CYLINDER HEAD SUB-ASSEMBLY
Click here

3. INSTALL VALVE STEM CAP
Click here

4. INSTALL VALVE LASH ADJUSTER ASSEMBLY
Click here

5. INSTALL NO. 1 VALVE ROCKER ARM SUB-ASSEMBLY
Click here

6. INSTALL NO. 1 CAMSHAFT BEARING CAP
Click here

7. INSTALL INTAKE CAMSHAFT SUB-ASSEMBLY
Click here

 Removal
REMOVAL CAUTION / NOTICE / HINT The necessary procedures (adjustment, calibration, initialization, or registration) that must be performed after parts are removed and installed, or replaced during cylinder head gasket removal/installation are shown below...
 Drive Belt
ComponentsCOMPONENTS ILLUSTRATION
*1 FAN AND GENERATOR V BELT *2 ENGINE UNDER COVER RH *3 NO. 1 ENGINE UNDER COVER ASSEMBLY - -
N*m (kgf*cm, ft...
Other information:
Toyota Yaris XP210 (2020-2025) Reapir and Service Manual: Removal
REMOVAL CAUTION / NOTICE / HINT The necessary procedures (adjustment, calibration, initialization, or registration) that must be performed after parts are removed and installed, or replaced during the rear No. 1 differential mount cushion replacement are shown below...
Toyota Yaris XP210 (2020-2025) Reapir and Service Manual: Fail-safe Chart
FAIL-SAFE CHART Constant Speed Control Mode: Condition Multi-information Display Cruise Control Indicator Warning Buzzer When the following condition(s) occurs while the vehicle is in motion during cruise control, the system clears the set vehicle speed and cancels cruise control...
Categories
- Manuals Home
- Toyota Yaris Owners Manual
- Toyota Yaris Service Manual
- To Set Speed
- Opening and Closing the Liftgate/Trunk Lid
- G16e-gts (engine Mechanical)
- New on site
- Most important about car
Refueling
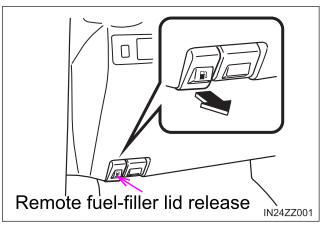
Before refueling, close all the doors, windows, and the liftgate/trunk lid, and switch the ignition OFF.
To open the fuel-filler lid, pull the remote fuel-filler lid release.