Toyota Yaris: Rear Brake / Disassembly
DISASSEMBLY
PROCEDURE
1. REMOVE CYLINDER BOOT
| (a) Using a screwdriver with its tip wrapped with protective tape, remove the 2 cylinder boots from the rear disc brake cylinder. NOTICE:
|
|

2. REMOVE REAR DISC BRAKE PISTON
| (a) Install a wooden block between the pistons of the rear disc brake cylinder to stop them coming out. |
|

(b) Using an air gun, gradually apply compressed air until the 2 rear disc brake pistons touch the wooden block.
CAUTION:
-
Do not insert your hand between the pistons to hold the rear disc brake cylinder.

- When compressed air is blown in, the rear disc brake piston may jump out quickly and trap your fingers.
NOTICE:
Do not allow any brake fluid to spatter.
(c) Remove the wooden block.
| (d) Remove the 2 rear disc brake pistons from the rear disc brake cylinder. |
|

3. REMOVE PISTON SEAL
| (a) Using a screwdriver with its tip wrapped with protective tape, remove the 2 piston seals from the rear disc brake cylinder. NOTICE: Do not damage the cylinder bore and the seal groove. |
|

4. REMOVE REAR DISC BRAKE BLEEDER PLUG CAP
(a) Remove the rear disc brake bleeder plug cap from the rear disc brake bleeder plug.
5. REMOVE REAR DISC BRAKE BLEEDER PLUG
(a) Remove the rear disc brake bleeder plug from the rear disc brake cylinder.
 Removal
REMOVAL CAUTION / NOTICE / HINT NOTICE:
To avoid degrading the precision of the assembly, do not loosen or remove the 2 bolts shown in the illustration...
 Inspection
INSPECTION PROCEDURE 1. INSPECT BRAKE CYLINDER AND PISTON (a) Check the rear disc brake cylinder bore and rear disc brake piston for rust and scoring. If necessary, replace the rear disc brake cylinder assembly and rear disc brake piston...
Other information:
Toyota Yaris XP210 (2020-2025) Reapir and Service Manual: Adjustment
ADJUSTMENT PROCEDURE 1. PREPARE VEHICLE FOR HEADLIGHT AIM ADJUSTMENT (a) Prepare the vehicle: Ensure that the vehicle body is not damaged or deformed around the headlights. Fill the fuel tank. Make sure that the oil is filled to the specified level...
Toyota Yaris XP210 (2020-2025) Reapir and Service Manual: Door Control Receiver
ComponentsCOMPONENTS ILLUSTRATION *1 DOOR CONTROL RECEIVER - - N*m (kgf*cm, ft.*lbf): Specified torque - - RemovalREMOVAL PROCEDURE 1. REMOVE DECK TRIM SIDE PANEL ASSEMBLY Click here 2. REMOVE DOOR CONTROL RECEIVER NOTICE: Do not drop, strike or otherwise subject the door control receiver to impact...
Categories
- Manuals Home
- Toyota Yaris Owners Manual
- Toyota Yaris Service Manual
- Removal
- Maintenance
- Headlights
- New on site
- Most important about car
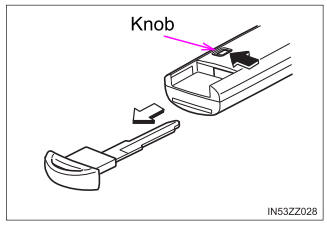
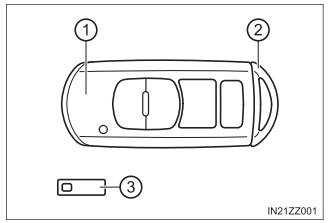
Keys
To use the auxiliary key, press the knob and pull out the auxiliary key from the smart key.