Toyota Yaris: Active Safety System / Active Safety System
Toyota Yaris XP210 (2020-2026) Owner's Manual / When Driving / Active Safety System / Active Safety System
Pre-Crash Safety Technology
Pre-crash safety technology is designed to assist the driver in averting collisions or reduce their severity in situations where they cannot be avoided.
- Collision damage reduction in low vehicle speed range
Forward driving: Low Speed Pre-Collision System.
Sensor
- Laser sensor
The laser sensor emits a near-infrared laser beam and receives the beam reflected off the reflective surface of a vehicle or obstruction in front, and the detected beam is then used for measurement. The laser sensor is used for the Low Speed Pre-Collision System.
The laser sensor is installed at the top of the windshield near the rearview mirror. Refer to Laser Sensor.

 Low Speed Pre-Collision System
The Low Speed Pre-Collision System is designed to reduce
damage in the event of a collision by operating the brake control
(Low Speed Pre-Collision System brake) when the system’s
laser sensor detects a vehicle ahead and determines that a collision with a
vehicle ahead is unavoidable...
Other information:
Toyota Yaris XP210 (2020-2026) Owner's Manual: Seat Precautions
When returning a rear seat to its original position, place the seat belt in its normal position. Verify that the seat belt pulls out and retracts. WARNING Make sure the adjustable components of a seat are locked in place Adjustable seats and seatbacks that are not securely locked are dangerous...
Toyota Yaris XP210 (2020-2026) Reapir and Service Manual: Installation
INSTALLATION PROCEDURE 1. INSTALL FRONT STABILIZER BAR Click here 2. INSTALL STEERING LINK ASSEMBLY Click here 3. TEMPORARILY INSTALL FRONT LOWER NO. 1 SUSPENSION ARM SUB-ASSEMBLY LH (a) Temporarily install the front lower No. 1 suspension arm sub-assembly LH to the front suspension crossmember sub-assembly with the 2 bolts and nut...
Categories
- Manuals Home
- Toyota Yaris Owners Manual
- Toyota Yaris Service Manual
- Fuse Panel Description
- Diagnostic Trouble Code Chart
- G16e-gts (engine Mechanical)
- New on site
- Most important about car
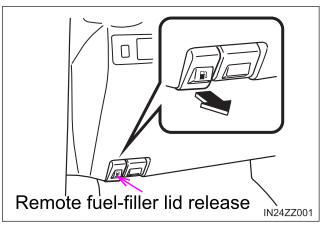
Refueling
Before refueling, close all the doors, windows, and the liftgate/trunk lid, and switch the ignition OFF.
To open the fuel-filler lid, pull the remote fuel-filler lid release.
Copyright © 2026 www.toyaris4.com