Toyota Yaris: Front Seat Outer Belt Assembly / Installation
INSTALLATION
CAUTION / NOTICE / HINT
HINT:
- Use the same procedure for the RH side and LH side.
- The procedure listed below is for the LH side.
PROCEDURE
1. INSTALL FRONT SEAT OUTER BELT ASSEMBLY
(a) Inspect the front seat outer belt assembly.
Click here

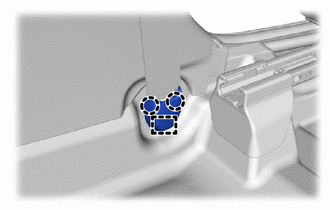
| (b) Engage the guides to temporarily install the front seat outer belt assembly. |
|

(c) Temporarily install the 2 bolts.
(d) Tighten bolt (A) and then bolt (B).
Torque:
Bolt (A) :
12.5 N·m {127 kgf·cm, 9 ft·lbf}
Bolt (B) :
42 N·m {428 kgf·cm, 31 ft·lbf}
| (e) Connect the shoulder anchor of the front seat outer belt assembly with the bolt. Torque: 42 N·m {428 kgf·cm, 31 ft·lbf} |
|

| (f) Connect the floor anchor of the front seat outer belt assembly with the bolt. Torque: 42 N·m {428 kgf·cm, 31 ft·lbf} |
|

| (g) Check that the ELR locks. NOTICE: This check should be performed with the front seat outer belt assembly installed to the vehicle. (1) With the front seat outer belt assembly installed to the vehicle, check that the belt locks when it is pulled out quickly. |
|

(h) Remove the bolt to disconnect the floor anchor of the front seat outer belt assembly.
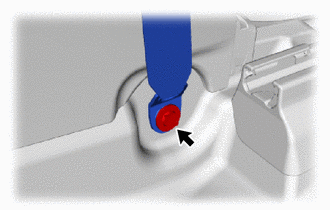
| (i) Connect the pretensioner connector and lock the locking button as shown in the illustration. NOTICE: Securely lock the locking button. |
|

2. INSTALL CENTER PILLAR UPPER GARNISH
Click here

3. INSTALL QUARTER TRIM PANEL ASSEMBLY
Click here

4. CONNECT FRONT SEAT OUTER BELT ASSEMBLY
| (a) Connect the floor anchor of the front seat outer belt assembly with the bolt. Torque: 42 N·m {428 kgf·cm, 31 ft·lbf} |
|
5. INSTALL LAP BELT OUTER ANCHOR COVER
| (a) Engage the guide and claws to install the lap belt outer anchor cover. |
|
6. INSTALL FRONT DOOR SCUFF PLATE
Click here

7. INSTALL REAR SEAT CUSHION LOCK HOOK
Click here

8. INSTALL BENCH TYPE REAR SEAT CUSHION ASSEMBLY
Click here

9. INSTALL REAR SEATBACK ASSEMBLY
Click here

10. CONNECT CABLE TO NEGATIVE AUXILIARY BATTERY TERMINAL
Click here

11. INSTALL INITIALIZATION AFTER RECONNECTING AUXILIARY BATTERY TERMINAL
NOTICE:
When disconnecting the cable, some systems need to be initialized after the cable is reconnected.
Click here

12. PERFORM DIAGNOSTIC SYSTEM CHECK
Click here

13. INSPECT SRS WARNING LIGHT
Click here

 Inspection
INSPECTION PROCEDURE 1. INSPECT FRONT SEAT OUTER BELT ASSEMBLY (a) Before installing the front seat outer belt assembly, check the ELR function. NOTICE: Do not disassemble the retractor...
 Disposal
DISPOSAL CAUTION / NOTICE / HINT CAUTION: Before performing pre-disposal deployment of any SRS part, review and closely follow all applicable environmental and hazardous material regulations...
Other information:
Toyota Yaris XP210 (2020-2024) Reapir and Service Manual: Parts Location
PARTS LOCATION ILLUSTRATION *1 SEMICONDUCTOR POWER INTEGRATION ECU *2 NO. 1 ENGINE ROOM RELAY BLOCK - STD P/I NO. 1 FUSE - INP STD NO. 1-1 FUSE ILLUSTRATION *1 MAIN BODY ECU (MULTIPLEX NETWORK BODY ECU) *2 POWER DISTRIBUTION BOX ASSEMBLY - ECU-IGR NO...
Toyota Yaris XP210 (2020-2024) Reapir and Service Manual: Removal
REMOVAL CAUTION / NOTICE / HINT HINT: Use the same procedure for the RH side and LH side. The following procedure is for the LH side. PROCEDURE 1. REMOVE FRONT DOOR LOWER FRAME BRACKET GARNISH Click here 2. REMOVE MULTIPLEX NETWORK MASTER SWITCH ASSEMBLY WITH FRONT ARMREST BASE UPPER PANEL (for Driver Side) Click here 3...
Categories
- Manuals Home
- Toyota Yaris Owners Manual
- Toyota Yaris Service Manual
- Headlights
- Removal
- Fuse Panel Description
- New on site
- Most important about car
Key Suspend Function
If a key is left in the vehicle, the functions of the key left in the vehicle are temporarily suspended to prevent theft of the vehicle.
To restore the functions, press the unlock button on the functions-suspended key in the vehicle.