Toyota Yaris: Front Seat Outer Belt Assembly / Inspection
INSPECTION
PROCEDURE
1. INSPECT FRONT SEAT OUTER BELT ASSEMBLY
| (a) Before installing the front seat outer belt assembly, check the ELR function. NOTICE: Do not disassemble the retractor. (1) When the inclination of the retractor is 12° or less, check that the belt can be pulled from the retractor. When the inclination of the retractor is over 27°, check that the belt locks. If the result is not as specified, replace the front seat outer belt assembly. |
|

 Removal
REMOVAL CAUTION / NOTICE / HINT CAUTION: Some of these service operations affect the SRS airbag system. Read the precautionary notices concerning the SRS airbag system before servicing...
 Installation
INSTALLATION CAUTION / NOTICE / HINT HINT:
Use the same procedure for the RH side and LH side.
The procedure listed below is for the LH side.
PROCEDURE 1...
Other information:
Toyota Yaris XP210 (2020-2024) Reapir and Service Manual: Front Radar Sensor Optical Axis Misalignment Malfunction (C1A1100)
DESCRIPTION The millimeter wave radar sensor assembly performs self-diagnosis to check for misalignment of its beam axis. If misalignment is detected, the millimeter wave radar sensor assembly stores DTC C1A1100. DTC No. Detection Item DTC Detection Condition Trouble Area C1A1100 Front Radar Sensor Optical Axis Misalignment Malfunction When the ignition switch is ON, the millimeter wave radar sensor assembly detects beam axis misalignment Millimeter wave radar sensor assembly beam axis adjustment Millimeter wave radar sensor assembly CAUTION / NOTICE / HINT NOTICE: When replacing the millimeter wave radar sensor assembly, always replace it with a new one...
Toyota Yaris XP210 (2020-2024) Reapir and Service Manual: Removal
REMOVAL CAUTION / NOTICE / HINT NOTICE: Make sure to use Toyota Genuine Windshield Glass Adhesive (High Modulus Type) or equivalent. HINT: Use the same procedure for the RH side and LH side. The following procedure is for the LH side. PROCEDURE 1...
Categories
- Manuals Home
- Toyota Yaris Owners Manual
- Toyota Yaris Service Manual
- Adjustment
- Battery Monitor Module General Electrical Failure (P058A01)
- Auto Lock/Unlock Function
- New on site
- Most important about car
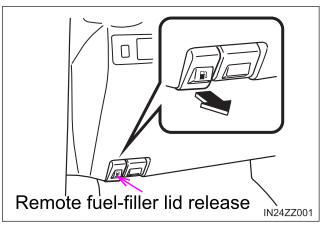
Refueling
Before refueling, close all the doors, windows, and the liftgate/trunk lid, and switch the ignition OFF.
To open the fuel-filler lid, pull the remote fuel-filler lid release.
Copyright © 2024 www.toyaris4.com