Toyota Yaris: Gf1a (transfer / 4wd / Awd) / Transfer Oil
Components
COMPONENTS
ILLUSTRATION
| Sale ins粉丝价格 ins粉丝价格 of www.518fans.com *1 | NO. 1 ENGINE UNDER COVER ASSEMBLY | *2 | TRANSFER FILLER PLUG |
| *3 | TRANSFER DRAIN PLUG | *4 | GASKET |
|
| Tightening torque for "Major areas involving basic vehicle performance such as moving/turning/stopping": N*m (kgf*cm, ft.*lbf) |
| N*m (kgf*cm, ft.*lbf): Specified torque |
| * | For use with SST and union nut wrench | ● | Non-reusable part |
On-vehicle Inspection
ON-VEHICLE INSPECTION
CAUTION / NOTICE / HINT
NOTICE:
-
The plug shown in the illustration is not the transfer filler plug, so do not attempt to fill transfer oil via this plug.

*a
NOT the Transfer Filler Plug
- Filling transfer oil via this plug will cause the transfer oil to be overfilled, resulting in oil leakage.
PROCEDURE
1. REMOVE NO. 1 ENGINE UNDER COVER ASSEMBLY
Click here
![]()
2. CHECK TRANSFER OIL
(a) Stop the vehicle on a level surface.
| (b) Using a 10 mm straight hexagon wrench and 10 x 12 mm long offset wrench, remove the transfer filler plug and gasket. |
|
| (c) Check that the oil level is between 0 to 5.0 mm (0 to 0.197 in.) from the bottom lip of the transfer filler plug hole. If the result is not as specified, add transfer oil. Oil grade: Toyota genuine differential gear oil LT API GL-5 or equivalent Viscosity: SAE 75W-85 NOTICE:
|
|
(d) If the oil level is low, refill oil after checking for oil leaks.
| (e) Using SST, 10 mm straight hexagon wrench and union nut wrench, install a new gasket into the transfer filler plug, and then install the transfer filler plug. SST: 09961-00950 Torque: Specified tightening torque : 39 N·m {398 kgf·cm, 29 ft·lbf} HINT:
|
|
3. INSTALL NO. 1 ENGINE UNDER COVER ASSEMBLY
Click here
![]()
 Transfer Case Front Oil Seal (for Rh Side)
ComponentsCOMPONENTS ILLUSTRATION
*1 DRIVE SHAFT BEARING BRACKET *2 TRANSFER CASE OIL SEAL RH
Tightening torque for "Major areas involving basic vehicle performance such as moving/turning/stopping" : N*m (kgf*cm, ft...

Other information:
Toyota Yaris XP210 (2020-2025) Reapir and Service Manual: Installation
INSTALLATION CAUTION / NOTICE / HINT HINT: Use the same procedure for the RH and LH sides. The procedure listed below is for the LH side. PROCEDURE 1. INSTALL SIDE AIRBAG PRESSURE SENSOR (a) Check that the ignition switch is off. (b) Check that the cable is disconnected from the negative (-) auxiliary battery terminal...
Toyota Yaris XP210 (2020-2025) Reapir and Service Manual: Parts Location
PARTS LOCATION ILLUSTRATION *1 BRAKE MASTER CYLINDER RESERVOIR ASSEMBLY - BRAKE FLUID LEVEL WARNING SWITCH *2 THERMISTOR ASSEMBLY *3 ECM *4 BRAKE ACTUATOR ASSEMBLY - SKID CONTROL ECU ILLUSTRATION *1 HEADLIGHT ASSEMBLY RH *2 HEADLIGHT ASSEMBLY LH *3 HEADLIGHT UNIT ASSEMBLY RH *4 HEADLIGHT UNIT ASSEMBLY LH *5 HEADLIGHT CORD *6 OUTER REAR VIEW MIRROR ASSEMBLY RH - SIDE TURN SIGNAL LIGHT ASSEMBLY RH *7 OUTER REAR VIEW MIRROR ASSEMBLY LH - SIDE TURN SIGNAL LIGHT ASSEMBLY LH *8 REAR COMBINATION LIGHT ASSEMBLY RH *9 REAR COMBINATION LIGHT ASSEMBLY LH *10 REAR TURN SIGNAL LIGHT LED ILLUSTRATION *1 MAIN BODY ECU (MULTIPLEX NETWORK BODY ECU) *2 POWER DISTRIBUTION BOX ASSEMBLY - ECU-DCC NO...
Categories
- Manuals Home
- Toyota Yaris Owners Manual
- Toyota Yaris Service Manual
- Headlights
- Maintenance
- Engine & Hybrid System
- New on site
- Most important about car
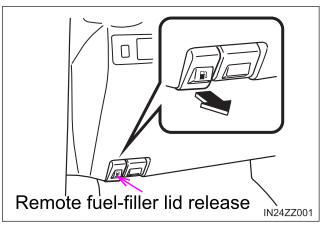
Refueling
Before refueling, close all the doors, windows, and the liftgate/trunk lid, and switch the ignition OFF.
To open the fuel-filler lid, pull the remote fuel-filler lid release.