Toyota Yaris: Vacuum Pump / Installation
INSTALLATION
PROCEDURE
1. INSTALL VACUUM PUMP ASSEMBLY
(a) When using new vacuum pump assembly:
(1) Apply engine oil to the No. 4 O-ring installed in a new vacuum pump assembly.
NOTICE:
Do not apply engine oil to the No. 2 O-ring.
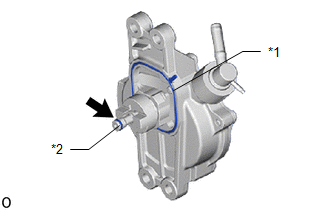
| *1 | No. 2 O-ring |
| *2 | No. 4 O-ring |
 | Engine oil |
(b) When reusing the vacuum pump assembly:
(1) Install a new No. 2 O-ring to the vacuum pump assembly.

| *1 | No. 2 O-ring |
| *2 | No. 4 O-ring |
 | Engine oil |
(2) Apply engine oil to the No. 4 O-ring on the vacuum pump assembly.
NOTICE:
Do not apply engine oil to the No. 2 O-ring.
(c) Apply engine oil to the inner surface of the installation hole.
| (d) Install the vacuum pump assembly so that the oil pipe engages with the hole of the camshaft and the coupling teeth with the grooves on the camshaft tip. NOTICE:
|
|

(e) Install the vacuum pump assembly with the 4 bolts.
Torque:
21 N·m {214 kgf·cm, 15 ft·lbf}
NOTICE:
After installation, check that there are no gaps between the matching surfaces and that the vacuum pump assembly is not installed at an angle.
2. CONNECT NO. 3 VACUUM TRANSMITTING HOSE
(a) Connect the No. 3 vacuum transmitting hose to the vacuum pump assembly.
3. CONNECT UNION TO CONNECTOR TUBE HOSE
(a) Connect the union to connector tube hose, and slide the clamp to secure it.
4. INSTALL NO. 1 WATER BY-PASS PIPE
(a) Engage the clamp.
(b) Install the No. 1 water by-pass pipe with the 2 nuts.
Torque:
10 N·m {102 kgf·cm, 7 ft·lbf}
5. CONNECT OUTLET HEATER WATER HOSE
(a) Connect the outlet heater water hose, and slide the clamp to secure it.
6. INSTALL ENGINE WIRE
(a) Engage the clamp to install the engine wire.
7. INSTALL NO. 1 FUEL VAPOR FEED HOSE
(a) Engage the 2 clamps to install the No. 1 fuel vapor feed hose.
8. INSTALL FUEL TUBE SUB-ASSEMBLY
(a) Engage the clamp to install the fuel tube sub-assembly.
9. INSTALL ECM
Click here

10. ADD ENGINE COOLANT
Click here

11. INSPECT FOR COOLANT LEAK
Click here

12. INSTALL NO. 1 ENGINE UNDER COVER ASSEMBLY
Click here

13. INSPECT VACUUM PUMP OPERATION
Click here

14. INSTALL NO. 1 ENGINE COVER SUB-ASSEMBLY
Click here

 Removal
REMOVAL CAUTION / NOTICE / HINT The necessary procedures (adjustment, calibration, initialization, or registration) that must be performed after parts are removed and installed, or replaced during vacuum pump assembly removal/installation are shown below...

Other information:
Toyota Yaris XP210 (2020-2025) Reapir and Service Manual: ID-BOX Component Internal Failure (B278D96)
DESCRIPTION When the certification ECU (smart key ECU assembly) detects an input signal indicating that the vehicle is equipped with an ID code box even though the ID code box is not registered, the certification ECU (smart key ECU assembly) stores this DTC...
Toyota Yaris XP210 (2020-2025) Reapir and Service Manual: Components
COMPONENTS ILLUSTRATION *1 REAR SEATBACK ASSEMBLY *2 BENCH TYPE REAR SEAT CUSHION ASSEMBLY *3 REAR SEAT CUSHION LOCK HOOK - - Tightening torque for "Major areas involving basic vehicle performance such as moving/turning/stopping" : N*m (kgf*cm, ft...
Categories
- Manuals Home
- Toyota Yaris Owners Manual
- Toyota Yaris Service Manual
- Fuse Panel Description
- Maintenance
- Headlights
- New on site
- Most important about car
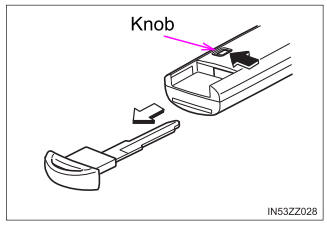
Keys
To use the auxiliary key, press the knob and pull out the auxiliary key from the smart key.