Toyota Yaris: Differential Case / Inspection
INSPECTION
PROCEDURE
1. INSPECT FRONT NO. 1 DIFFERENTIAL CASE SUB-ASSEMBLY
| (a) Using SST, rotate the front differential side gear as shown in the illustration. SST: 09528-52010 09528-05030 Standard: The front differential side gear does not lock when rotated in either direction.
|
|
2. INSPECT FRONT DIFFERENTIAL SIDE GEAR THRUST AMOUNT
(a) Secure the front differential case assembly with ring gear in a vise between aluminum plates.
NOTICE:
Do not overtighten the vise.
| (b) Using SST and a dial indicator, measure the front differential side gear thrust amount. SST: 09528-52010 09528-05030 Front Differential Side Gear Thrust Amount: 0.08 mm (0.00315 in.) or less HINT:
If the result is not as specified, replace the 2 front differential side gears, 2 front differential pinions and 2 conical springs. |
|
3. INSPECT FRONT DIFFERENTIAL PINION BACKLASH
(a) Set SST as shown in the illustration and tighten it.

| *a | Turn | *b | Hold |
SST: 09528-52010
09528-05010
09953-05010
Torque:
10 N·m {102 kgf·cm, 7 ft·lbf}
| (b) Install the front No. 1 differential pinion shaft to the front differential pinion as shown in the illustration. |
|
(c) Using a dial indicator, measure the front differential pinion backlash.
Standard Backlash:
0.15 mm (0.00591 in.) or less
If the backlash is not as specified, replace the front No. 1 differential side gear thrust washers with washers of a different thickness. Use the table below to select a front No. 1 differential side gear thrust washer which will ensure that the backlash is within the specification.
Front No. 1 Differential Side Gear Thrust Washer Thickness:
| Specified Condition |
|---|
| 1.25 mm (0.0492 in.) |
| 1.30 mm (0.0512 in.) |
| 1.35 mm (0.0531 in.) |
| 1.40 mm (0.0551 in.) |
| 1.45 mm (0.0571 in.) |
| 1.50 mm (0.0591 in.) |
| 1.55 mm (0.0610 in.) |
| 1.60 mm (0.0630 in.) |
| 1.65 mm (0.0650 in.) |
| 1.70 mm (0.0669 in.) |
| 1.75 mm (0.0689 in.) |
| 1.80 mm (0.0709 in.) |
| 1.85 mm (0.0728 in.) |
| 1.90 mm (0.0748 in.) |
| 1.95 mm (0.0768 in.) |
HINT:
Select front No. 1 differential side gear thrust washers of the same thickness for both the right and left side.
4. INSPECT FRONT DIFFERENTIAL PINION THRUST WASHER
| (a) Using a micrometer, measure the thickness of the front differential pinion thrust washer. Minimum Thickness: 0.54 mm (0.0213 in.) If the thickness is less than the minimum, replace the front differential pinion thrust washer. |
|
5. INSPECT FRONT NO. 1 DIFFERENTIAL PINION SHAFT
| (a) Using a micrometer, measure the outer diameter of the front No. 1 differential pinion shaft. Minimum Outer Diameter: 20.499 mm (0.807 in.) If the outer diameter is less than the minimum, replace the front No. 1 differential pinion shaft. |
|
 Disassembly
DISASSEMBLY PROCEDURE 1. REMOVE FRONT DIFFERENTIAL RING GEAR (a) Mount the front differential ring gear in a vise between aluminum plates. NOTICE:
Be careful not to damage the front differential ring gear...
 Reassembly
REASSEMBLY PROCEDURE 1. INSTALL FRONT DIFFERENTIAL SIDE GEAR (w/o LSD) (a) Coat the front differential side gear, front No. 1 differential side gear thrust washer and conical spring with gear oil...
Other information:
Toyota Yaris XP210 (2020-2025) Reapir and Service Manual: Accelerator Pedal
ComponentsCOMPONENTS ILLUSTRATION *1 ACCELERATOR PEDAL SENSOR ASSEMBLY *2 NO. 1 INSTRUMENT PANEL UNDER COVER SUB-ASSEMBLY Tightening torque for "Major areas involving basic vehicle performance such as moving/turning/stopping" : N*m (kgf*cm, ft...
Toyota Yaris XP210 (2020-2025) Reapir and Service Manual: Inspection
INSPECTION PROCEDURE 1. INSPECT AUTO HIGH BEAM SWITCH (a) Check the resistance. (1) Measure the resistance according to the value(s) in the table below. Standard Resistance: Tester Connection Condition Specified Condition H47-5 (+B) - H47-2 (E) Auto high beam switch off 10 kΩ or higher H47-5 (+B) - H47-2 (E) Auto high beam switch on Below 1 Ω If the result is not as specified, replace the auto high beam switch...
Categories
- Manuals Home
- Toyota Yaris Owners Manual
- Toyota Yaris Service Manual
- Fuse Panel Description
- Opening and Closing the Liftgate/Trunk Lid
- Diagnostic Trouble Code Chart
- New on site
- Most important about car
Refueling
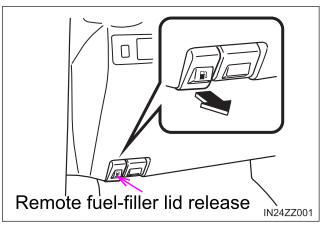
Before refueling, close all the doors, windows, and the liftgate/trunk lid, and switch the ignition OFF.
To open the fuel-filler lid, pull the remote fuel-filler lid release.


