Toyota Yaris: Rear View Monitor / Displayable Range on the Screen
Toyota Yaris XP210 (2020-2025) Owner's Manual / When Driving / Rear View Monitor / Displayable Range on the Screen
The images on the screen may be different from the actual conditions.
- Screen display

- Actual view

- The displayable range varies depending on the vehicle and road conditions.
- The displayable range is limited. Objects under the bumper or around the bumper ends cannot be displayed.
- The distance appearing in the displayed image is different from the actual distance because the rear view parking camera is equipped with a specific lens.
- Some optionally installed vehicle accessories may be picked up by the camera. Do not install any optional parts that can interfere with the camera view, such as illuminating parts or parts made of reflective material.
- It may be difficult to see the display under the following conditions,
however,
it does not indicate a malfunction.
- In darkened areas.
- When the temperature around the lens is high/low.
- When the camera is wet such as on a rainy day or during periods of high humidity.
- When foreign material such as mud is stuck around the camera.
- When the camera lens reflects sunlight or headlight beams.
- Image display may be delayed if the temperature around the camera is low.
 Rear View Parking Camera Location
4-Door
5-Door
Switching to the Rear View Monitor Display
Shift the shift lever to R with the ignition switched ON to switch the
display to the rear view monitor display...
 Viewing the Display
Guide lines which indicate the width of the vehicle (yellow) are displayed on
the screen as a reference to the approximate width of the
vehicle in comparison to the width of the parking space you are about
to back into...
Other information:
Toyota Yaris XP210 (2020-2025) Reapir and Service Manual: Diagnostic Trouble Code Chart
D..
Toyota Yaris XP210 (2020-2025) Reapir and Service Manual: On-vehicle Inspection
ON-VEHICLE INSPECTION PROCEDURE 1. INSPECT CLUTCH PEDAL HEIGHT (a) Remove the front door scuff plate LH. Click here (b) Remove the cowl side trim board LH. Click here (c) Turn back the floor carpet. (d) Turn back the dash panel insulator assembly...
Categories
- Manuals Home
- Toyota Yaris Owners Manual
- Toyota Yaris Service Manual
- Brake System Control Module "A" System Voltage System Voltage Low (C137BA2)
- To Set Speed
- Engine & Hybrid System
- New on site
- Most important about car
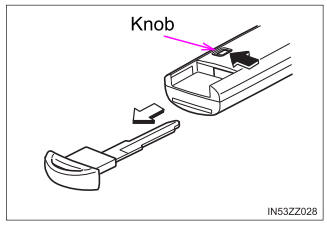
Keys
To use the auxiliary key, press the knob and pull out the auxiliary key from the smart key.
Copyright © 2025 www.toyaris4.com