Toyota Yaris: Lighting (int) / Ambient Light
Components
COMPONENTS
ILLUSTRATION

| *A | for Driver Side | *B | for Front Passenger Side |
| *1 | MULTIPLEX NETWORK MASTER SWITCH ASSEMBLY WITH FRONT ARMREST BASE UPPER PANEL | *2 | POWER WINDOW REGULATOR SWITCH ASSEMBLY WITH FRONT ARMREST BASE UPPER PANEL |
| *3 | NO. 1 INTERIOR ILLUMINATION LIGHT ASSEMBLY | *4 | FRONT DOOR TRIM GARNISH |
Removal
REMOVAL
CAUTION / NOTICE / HINT
HINT:
- Use the same procedure for the RH side and LH side.
- The following procedure is for the LH side.
PROCEDURE
1. REMOVE MULTIPLEX NETWORK MASTER SWITCH ASSEMBLY WITH FRONT ARMREST BASE UPPER PANEL (for Driver Side)
Click here

2. REMOVE POWER WINDOW REGULATOR SWITCH ASSEMBLY WITH FRONT ARMREST BASE UPPER PANEL (for Front Passenger Side)
Click here

3. REMOVE FRONT DOOR TRIM GARNISH
Click here

4. REMOVE NO. 1 INTERIOR ILLUMINATION LIGHT ASSEMBLY
| (a) Disconnect the connector. |
|

(b) Disengage the claws to remove the No. 1 interior illumination light assembly.
Inspection
INSPECTION
PROCEDURE
1. INSPECT NO. 1 INTERIOR ILLUMINATION LIGHT ASSEMBLY LH
(a) Check that the LED illuminates.
| (1) Apply auxiliary battery voltage to the No. 1 interior illumination light assembly LH and check that the LED illuminates. OK:
If the result is not as specified, replace the No. 1 interior illumination light assembly LH. |
|

2. INSPECT NO. 1 INTERIOR ILLUMINATION LIGHT ASSEMBLY RH
(a) Check that the LED illuminates.
| (1) Apply auxiliary battery voltage to the No. 1 interior illumination light assembly RH and check that the LED illuminates. OK:
If the result is not as specified, replace the No. 1 interior illumination light assembly RH. |
|

Installation
INSTALLATION
CAUTION / NOTICE / HINT
HINT:
- Use the same procedure for the RH side and LH side.
- The following procedure is for the LH side.
PROCEDURE
1. INSTALL NO. 1 INTERIOR ILLUMINATION LIGHT ASSEMBLY
| (a) Engage the claws to install the No. 1 interior illumination light assembly. |
|

(b) Connect the connector.
2. INSTALL FRONT DOOR TRIM GARNISH
Click here

3. INSTALL MULTIPLEX NETWORK MASTER SWITCH ASSEMBLY WITH FRONT ARMREST BASE UPPER PANEL (for Driver Side)
Click here

4. INSTALL POWER WINDOW REGULATOR SWITCH ASSEMBLY WITH FRONT ARMREST BASE UPPER PANEL (for Front Passenger Side)
Click here


 Back Door Courtesy Switch
ComponentsCOMPONENTS ILLUSTRATION
*1 BACK DOOR LOCK ASSEMBLY WITH COURTESY LIGHT SWITCH *2 BACK DOOR TRIM BOARD
N*m (kgf*cm, ft.*lbf): Specified torque
MP grease RemovalREMOVAL CAUTION / NOTICE / HINT Click here
InspectionINSPECTION PROCEDURE 1...
Other information:
Toyota Yaris XP210 (2020-2025) Reapir and Service Manual: Vsc Off Switch
ComponentsCOMPONENTS ILLUSTRATION *1 VSC OFF SWITCH (COMBINATION SWITCH ASSEMBLY) - - InspectionINSPECTION PROCEDURE 1. INSPECT VSC OFF SWITCH (COMBINATION SWITCH ASSEMBLY) (a) Check the resistance. (1) Measure the resistance according to the value(s) in the table below...
Toyota Yaris XP210 (2020-2025) Reapir and Service Manual: Invalid Data Received from Brake System Control Module Invalid Serial Data Received (U041881)
DESCRIPTION The millimeter wave radar sensor assembly receives signals related to the brake control condition from the skid control ECU (brake actuator assembly) via the CAN communication line. If the millimeter wave radar sensor assembly receives signals from the skid control ECU (brake actuator assembly) indicating a brake control system malfunction, the millimeter wave radar sensor assembly stores DTC U041881...
Categories
- Manuals Home
- Toyota Yaris Owners Manual
- Toyota Yaris Service Manual
- Adjustment
- Power Integration No.1 System Missing Message (B235287,B235587,B235787-B235987)
- Opening and Closing the Liftgate/Trunk Lid
- New on site
- Most important about car
Refueling
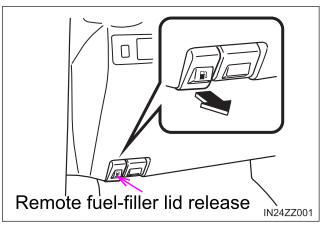
Before refueling, close all the doors, windows, and the liftgate/trunk lid, and switch the ignition OFF.
To open the fuel-filler lid, pull the remote fuel-filler lid release.