Toyota Yaris: Interior Equipment / Accessory Socket
Toyota Yaris XP210 (2020-2025) Owner's Manual / Interior Features / Interior Equipment / Accessory Socket
Only use genuine Toyota accessories or the equivalent requiring no greater than 120 W (DC 12 V, 10 A).
The ignition must be switched to ACC or ON.
Type A

Type B

NOTICE
- To prevent accessory socket damage or electrical failure, pay
attention to
the following:
- Do not use accessories that require more than 120 W (DC 12 V, 10 A).
- Do not use accessories that are not genuine Toyota accessories or the equivalent.
- Close the cover when the accessory socket is not in use to prevent foreign objects and liquids from getting into the accessory socket.
- Correctly insert the plug into the accessory socket.
- Do not insert the cigarette lighter into the accessory socket.
- Noise may occur on the audio playback depending on the device connected to the accessory socket.
- Depending on the device connected to the accessory socket, the vehicle’s electrical system may be affected, which could cause the warning light to illuminate. Disconnect the connected device and make sure that the problem is resolved. If the problem is resolved, disconnect the device from the socket and switch the ignition off. If the problem is not resolved, consult your Toyota dealer.
- To prevent discharging of the battery, do not use the socket for long periods with the engine off or idling.
 Interior Lights
Overhead Lights
OFF
DOOR
ON
Map Lights
When the overhead light switch
is in the door or off position,
press the lens to illuminate the
map lights, and then press the
lens again to turn them off...
 Cup Holder
WARNING
Never use a cup holder to hold hot liquids while the vehicle is
moving
Using a cup holder to hold hot liquids while the vehicle is moving is
dangerous...
Other information:
Toyota Yaris XP210 (2020-2025) Owner's Manual: Fuel Gauge
The fuel gauge shows approximately how much fuel is remaining in the tank when the ignition is switched ON. We recommend keeping the tank over 1/4 full. Full 1/4 Full Empty If the low fuel warning light illuminates or the fuel level is very low, refuel as soon as possible...
Toyota Yaris XP210 (2020-2025) Reapir and Service Manual: Tire And Wheel
ComponentsCOMPONENTS ILLUSTRATION *1 WHEEL ASSEMBLY *2 AXLE HUB NUT Tightening torque for "Major areas involving basic vehicle performance such as moving/turning/stopping" : N*m (kgf*cm, ft.*lbf) - - RemovalREMOVAL PROCEDURE 1...
Categories
- Manuals Home
- Toyota Yaris Owners Manual
- Toyota Yaris Service Manual
- Engine Start Function When Key Battery is Dead
- Auto Lock/Unlock Function
- How to connect USB port/Auxiliary jack
- New on site
- Most important about car
Refueling
Before refueling, close all the doors, windows, and the liftgate/trunk lid, and switch the ignition OFF.
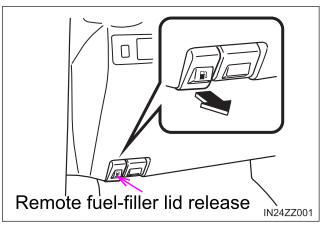
To open the fuel-filler lid, pull the remote fuel-filler lid release.
Copyright © 2025 www.toyaris4.com