Toyota Yaris: Rear Shock Absorber / Disposal
DISPOSAL
PROCEDURE
1. DISPOSE OF REAR SHOCK ABSORBER ASSEMBLY
| (a) Extend the piston rod and secure the rear shock absorber assembly at an angle in a vise. |
|

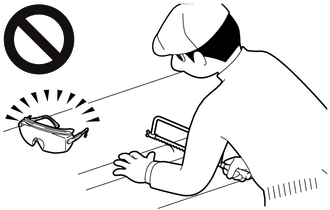
(b) Using a hacksaw, slowly make a hole at the position indicated by the arrow in the illustration to discharge the gas inside.
CAUTION:
- Always use a cloth to prevent shards of metal flying about due to the release of pressurized gas.
- Always wear safety glasses.
HINT:
The gas is colorless, odorless and non-poisonous.
 Installation
INSTALLATION CAUTION / NOTICE / HINT HINT:
Use the same procedure for the RH side and LH side.
The following procedure is for the LH side.
PROCEDURE 1...

Other information:
Toyota Yaris XP210 (2020-2024) Reapir and Service Manual: Components
C..
Toyota Yaris XP210 (2020-2024) Reapir and Service Manual: Components
COMPONENTS ILLUSTRATION *1 NO. 2 HEATER TO REGISTER DUCT SUB-ASSEMBLY *2 PACKAGE TRAY TRIM PANEL ASSEMBLY *3 DECK BOARD ASSEMBLY *4 DECK FLOOR BOX RH *5 DECK FLOOR BOX LH *6 FRONT DOOR OPENING TRIM WEATHERSTRIP LH *7 FRONT DOOR OPENING TRIM WEATHERSTRIP RH - - ILLUSTRATION *1 LAP BELT OUTER ANCHOR COVER *2 FRONT SEAT OUTER BELT ASSEMBLY LH *3 FRONT SEAT OUTER BELT ASSEMBLY RH *4 REAR SEATBACK HINGE SUB-ASSEMBLY LH *5 REAR SEATBACK HINGE SUB-ASSEMBLY RH *6 QUARTER TRIM PANEL ASSEMBLY LH *7 QUARTER TRIM PANEL ASSEMBLY RH *8 CENTER PILLAR UPPER GARNISH LH *9 CENTER PILLAR UPPER GARNISH RH *10 DECK TRIM REAR COVER *11 DECK TRIM SIDE PANEL ASSEMBLY LH *12 DECK TRIM SIDE PANEL ASSEMBLY RH *13 REAR SEAT OUTER BELT ASSEMBLY LH *14 REAR SEAT OUTER BELT ASSEMBLY RH *15 INNER ROOF SIDE GARNISH LH *16 INNER ROOF SIDE GARNISH RH *17 ROOF SIDE INNER GARNISH LH *18 ROOF SIDE INNER GARNISH RH *19 NO...
Categories
- Manuals Home
- Toyota Yaris Owners Manual
- Toyota Yaris Service Manual
- Starting the Engine
- To Set Speed
- Headlights
- New on site
- Most important about car
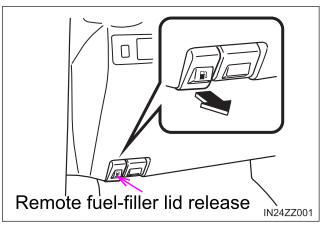
Refueling
Before refueling, close all the doors, windows, and the liftgate/trunk lid, and switch the ignition OFF.
To open the fuel-filler lid, pull the remote fuel-filler lid release.
Copyright © 2024 www.toyaris4.com