Toyota Yaris: Output Shaft / Disassembly
DISASSEMBLY
PROCEDURE
1. INSPECT 1ST DRIVEN GEAR THRUST CLEARANCE
Click here

2. INSPECT 1ST DRIVEN GEAR RADIAL CLEARANCE
Click here

3. INSPECT 2ND DRIVEN GEAR THRUST CLEARANCE
Click here

4. INSPECT 2ND DRIVEN GEAR RADIAL CLEARANCE
Click here

5. INSPECT 3RD DRIVEN GEAR THRUST CLEARANCE
Click here

6. INSPECT 3RD DRIVEN GEAR RADIAL CLEARANCE
Click here

7. INSPECT 4TH DRIVEN GEAR THRUST CLEARANCE
Click here

8. INSPECT 4TH DRIVEN GEAR RADIAL CLEARANCE
Click here

9. REMOVE OUTPUT SHAFT BEARING SHAFT SNAP RING
| (a) Using a snap ring expander, remove the output shaft bearing shaft snap ring from the No. 1 output shaft. |
|

10. REMOVE OUTPUT SHAFT REAR BEARING
| (a) Using SST and a press, remove the output shaft rear bearing from the No. 1 output shaft. SST: 09201-31010 SST: 09950-00020 |
|

11. REMOVE SPACER
| (a) Remove the spacer from the No. 1 output shaft. |
|

12. REMOVE 3RD GEAR NEEDLE ROLLER BEARING
| (a) Remove the needle roller bearing from the No. 1 output shaft. |
|

13. REMOVE 3RD DRIVEN GEAR SYNCHRONIZER RING SET
| (a) Remove the 3rd driven gear synchronizer ring set from the No. 1 output shaft. |
|

14. REMOVE SHAFT SNAP RING
| (a) Using 2 screwdrivers and a hammer, remove the shaft snap ring from the No. 1 output shaft. |
|

15. REMOVE 4TH DRIVEN GEAR
| (a) Using SST and a press, remove the No. 2 transmission hub sleeve, 4th driven gear synchronizer ring set, and 4th driven gear from the No. 1 output shaft. SST: 09950-00020 |
|

16. REMOVE 4TH DRIVEN GEAR SYNCHRONIZER RING SET
| (a) Remove the 4th driven gear synchronizer ring set from the 4th driven gear. |
|

17. REMOVE NO. 2 TRANSMISSION CLUTCH HUB
| (a) Remove the No. 2 transmission clutch hub, 3 No. 1 synchromesh shifting keys, 3 balls and 3 synchronizer shifting key springs from the No. 2 transmission hub sleeve. NOTICE: Pay attention to prevent the balls and synchronizer shifting key springs from scattering. |
|

18. REMOVE 4TH GEAR BEARING SPACER
| (a) Remove the needle roller bearing from the No. 1 output shaft. |
|

19. REMOVE SPACER
| (a) Remove the spacer from the No. 1 output shaft. |
|

20. REMOVE OUTPUT SHAFT BEARING SHAFT SNAP RING
| (a) Using a snap ring expander, remove the output shaft bearing shaft snap ring from the No. 1 output shaft. |
|

21. REMOVE 2ND GEAR BEARING INNER RACE
| (a) Remove the 2nd driven gear bearing inner race from the No. 1 output shaft. |
|

22. REMOVE 2ND DRIVEN GEAR
| (a) Remove the 2nd driven gear from the No. 1 output shaft. |
|

23. REMOVE NEEDLE ROLLER BEARING
| (a) Remove the needle roller bearing from the No. 1 output shaft. |
|

24. REMOVE SYNCHROMESH SHIFTING KEY BALL
| (a) Using a magnet hand, remove the synchromesh shifting key ball from the No. 1 output shaft. |
|

25. REMOVE NO. 1 SYNCHRONIZER RING SET
| (a) Remove the 2nd driven gear synchronizer ring set from the No. 1 output shaft. |
|

26. REMOVE 1ST DRIVEN GEAR
| (a) Using SST and a press, remove the No. 1 transmission hub sleeve, 1st driven gear synchronizer ring set and 1st driven gear from the No. 1 output shaft. SST: 09950-00020 |
|

27. REMOVE 1ST DRIVEN GEAR SYNCHRONIZER RING SET
| (a) Remove the 1st driven synchronizer ring set from the 1st driven gear. |
|

28. REMOVE NO. 1 TRANSMISSION CLUTCH HUB
| (a) Remove the No. 1 transmission clutch hub, 3 No. 1 synchromesh shifting keys, 3 balls and 3 synchronizer shifting key springs from the No. 1 transmission hub sleeve. NOTICE: Pay attention to prevent the balls and synchronizer shifting key springs from scattering. |
|

29. REMOVE NEEDLE ROLLER BEARING
| (a) Remove the needle roller bearing from the No. 1 output shaft. |
|

30. REMOVE OUTPUT SHAFT FRONT BEARING INNER RACE
| (a) Using SST and a press, remove the output shaft front bearing inner race from the No. 1 output shaft. SST: 09201-31010 SST: 09950-00020 |
|

31. INSPECT 5TH DRIVEN GEAR THRUST CLEARANCE
Click here

32. INSPECT 5TH DRIVEN GEAR RADIAL CLEARANCE
Click here

33. INSPECT 6TH DRIVEN GEAR THRUST CLEARANCE
Click here

34. INSPECT 6TH DRIVEN GEAR RADIAL CLEARANCE
Click here

35. INSPECT REVERSE DRIVEN GEAR THRUST CLEARANCE
Click here

36. INSPECT REVERSE DRIVEN GEAR RADIAL CLEARANCE
Click here

37. REMOVE NO. 2 OUTPUT SHAFT BEARING SNAP RING
| (a) Using a snap ring expander, remove the No. 2 output shaft bearing snap ring from the No. 2 output shaft. |
|

38. REMOVE NO. 2 OUTPUT SHAFT REAR BEARING
| (a) Using SST and a press, remove the No. 2 output shaft rear bearing and 6th driven gear from the No. 2 output shaft. SST: 09201-31010 SST: 09950-00020 |
|

39. REMOVE NEEDLE ROLLER BEARING
| (a) Remove the needle roller bearing from the No. 2 output shaft. |
|

40. REMOVE SPACER
| (a) Remove the spacer from the No. 2 output shaft. |
|

41. REMOVE 6TH DRIVEN GEAR SYNCHRONIZER RING
| (a) Remove the 6th driven gear synchronizer ring from the No. 2 output shaft. |
|

42. REMOVE SHAFT SNAP RING
| (a) Using 2 screwdrivers and a hammer, remove the shaft snap ring from the No. 2 output shaft. |
|

43. REMOVE 5TH DRIVEN GEAR
| (a) Using SST and a press, remove the No. 3 transmission hub sleeve, 5th driving gear synchronizer ring, 5th driven gear, 2 spacers and needle roller bearing from the No. 2 output shaft. SST: 09950-00020 |
|

44. REMOVE 5TH DRIVEN GEAR SYNCHRONIZER RING
| (a) Remove the 5th driven gear synchronizer ring from the 5th driven gear. |
|

45. REMOVE NO. 3 TRANSMISSION CLUTCH HUB
| (a) Remove the No. 3 transmission clutch hub, 3 No. 1 synchromesh shifting keys, 3 ball and 3 synchronizer shifting key springs from the No. 3 transmission hub sleeve. NOTICE: Pay attention to prevent the balls and synchronizer shifting key springs from scattering. |
|

46. REMOVE SHAFT SNAP RING
| (a) Using 2 screwdrivers and a hammer, remove the shaft snap ring from the No. 2 output shaft. |
|

47. REMOVE REVERSE DRIVEN GEAR
| (a) Using SST and a press, remove the No. 4 transmission hub sleeve, reverse driven gear synchronizer ring and reverse driven gear from the No. 2 output shaft. SST: 09950-00020 |
|

48. REMOVE REVERSE DRIVEN GEAR SYNCHRONIZER RING
| (a) Remove the reverse driven gear synchronizer ring from the reverse driven gear. |
|

49. REMOVE NO. 4 TRANSMISSION CLUTCH HUB
| (a) Remove the No. 4 transmission clutch hub, key spring and shifting key from the No. 4 transmission hub sleeve. |
|

50. REMOVE NEEDLE ROLLER BEARING
| (a) Remove the needle roller bearing from the No. 2 output shaft. |
|

51. REMOVE NO. 2 OUTPUT SHAFT FRONT BEARING
| (a) Using SST and a press, remove the No. 2 output shaft front bearing from the No. 2 output shaft. SST: 09201-31010 SST: 09950-00020 |
|

 Components
COMPONENTS ILLUSTRATION
*1 OUTPUT SHAFT BEARING SHAFT SNAP RING *2 NEEDLE ROLLER BEARING *3 SYNCHRONIZER SHIFTING KEY SPRING *4 SHAFT SNAP RING *5 SPACER *6 BALL *7 OUTPUT SHAFT FRONT BEARING INNER RACE *8 SYNCHROMESH SHIFTING KEY BALL *9 NO...
 Inspection
INSPECTION PROCEDURE 1. INSPECT NO. 1 OUTPUT SHAFT (a) Check the No. 1 output shaft for wear and damage.
(b) Using a dial indicator, check the No...
Other information:
Toyota Yaris XP210 (2020-2024) Reapir and Service Manual: Input/Turbine Speed Sensor "A" Circuit Short to Battery (P071512,P071514)
DESCRIPTION The transmission revolution sensor is mounted on the transaxle. The ECM calculates the transaxle input shaft speed using the sensor. When the input shaft rotates, the sensor generates a pulse signal and sends the signal to the ECM. The ECM calculates the input shaft speed based on the signal...
Toyota Yaris XP210 (2020-2024) Reapir and Service Manual: Inspection
INSPECTION PROCEDURE 1. INSPECT BRAKE CYLINDER AND PISTON (a) Check the front disc brake cylinder bore and front disc brake piston for rust and scoring. If necessary, replace the front disc brake cylinder assembly and front disc brake piston. 2. INSPECT PAD LINING THICKNESS (a) Using a ruler, measure the front disc brake pad lining thickness...
Categories
- Manuals Home
- Toyota Yaris Owners Manual
- Toyota Yaris Service Manual
- Fuse Panel Description
- Adjustment
- How to use USB mode
- New on site
- Most important about car
Keys
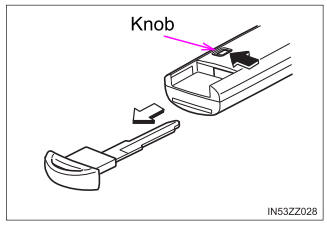
To use the auxiliary key, press the knob and pull out the auxiliary key from the smart key.