Toyota Yaris: Air Conditioning Unit / Disassembly
DISASSEMBLY
PROCEDURE
1. REMOVE LOWER DEFROSTER NOZZLE ASSEMBLY
| (a) Disengage the claws and guides to remove the lower defroster nozzle assembly. |
|

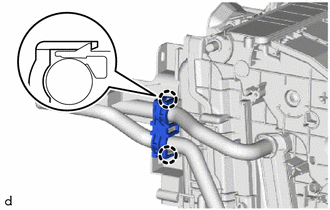
2. REMOVE COOLER PIPE GROMMET
| (a) Remove the cooler pipe grommet. |
|

3. REMOVE COOLER EXPANSION VALVE
| (a) Using a 4 mm hexagon socket wrench, remove the 2 hexagon bolts and cooler expansion valve. |
|

(b) Remove the 2 O-rings from the No. 1 cooler evaporator sub-assembly.
4. REMOVE ASPIRATOR
| (a) Disengage the claws and guide to remove the aspirator. |
|

5. REMOVE NO. 2 AIR DUCT
| (a) Remove the screw. |
|

(b) Disengage the claws to remove the No. 2 air duct.
6. REMOVE COVER
| (a) Disengage the claws to remove the cover. |
|

7. REMOVE DRAIN COOLER HOSE
| (a) Remove the drain cooler hose. |
|

8. REMOVE AIR CONDITIONING HARNESS ASSEMBLY
| (a) Disconnect the 3 connectors. |
|

(b) Disengage guides to remove the air conditioning harness assembly.
9. REMOVE AIR CONDITIONING AMPLIFIER ASSEMBLY
| (a) Remove the 2 screws. |
|

(b) Disengage the guide to remove the air conditioning amplifier assembly.
10. REMOVE BLOWER ASSEMBLY
Click here

11. REMOVE NO. 1 AIR CONDITIONING RADIATOR DAMPER SERVO SUB-ASSEMBLY
| (a) Remove the 3 screws and No. 1 air conditioning radiator damper servo sub-assembly. |
|

12. REMOVE HEATER COVER
| (a) Remove the screw and heater cover. |
|

13. REMOVE HEATER CLAMP
| (a) Disengage the claws to remove the heater clamp. |
|
14. REMOVE HEATER RADIATOR UNIT SUB-ASSEMBLY
| (a) Remove the heater radiator unit sub-assembly as shown in the illustration. |
|

15. REMOVE NO. 1 COOLER EVAPORATOR SUB-ASSEMBLY
| (a) Disengage the clamp and guides. |
|

| (b) Remove the 2 screws. |
|

(c) Disengage the claws and guides to remove the upper heater case with No. 1 cooler evaporator sub-assembly.
| (d) Remove the No. 1 cooler evaporator sub-assembly with No. 1 cooler thermistor from the upper heater case. |
|

16. REMOVE NO. 1 COOLER THERMISTOR
Click here

17. REMOVE AIR DUCT ASSEMBLY
| (a) Remove the 3 retainers. |
|

(b) Separate the front panel silencer as shown in the illustration.
| (c) Remove the 2 nuts and air duct assembly. |
|

 Removal
REMOVAL CAUTION / NOTICE / HINT The necessary procedures (adjustment, calibration, initialization, or registration) that must be performed after parts are removed, installed, or replaced during the air conditioner unit assembly removal/installation are shown below...
 Reassembly
REASSEMBLY PROCEDURE 1. INSTALL AIR DUCT ASSEMBLY (a) Install the air duct assembly with the 2 nuts.
(b) Install the front panel silencer as shown in the illustration...
Other information:
Toyota Yaris XP210 (2020-2024) Reapir and Service Manual: Parts Location
PARTS LOCATION ILLUSTRATION *A w/ Toyota Safety Sense *B w/ Active Noise Control System *1 ENGINE HOOD COURTESY SWITCH (HOOD LOCK ASSEMBLY) *2 VACUUM SENSOR ASSEMBLY *3 INNER REAR VIEW MIRROR ASSEMBLY *4 ECM *5 SKID CONTROL ECU (BRAKE ACTUATOR ASSEMBLY) *6 EXTERNAL BACKUP BOOST CONVERTER (ECO RUN VEHICLE CONVERTER ASSEMBLY) *7 MILLIMETER WAVE RADAR SENSOR ASSEMBLY *8 FORWARD RECOGNITION CAMERA *9 ENGINE ROOM RELAY BLOCK - EFI-MAIN NO...
Toyota Yaris XP210 (2020-2024) Reapir and Service Manual: Installation
INSTALLATION PROCEDURE 1. INSTALL AIR CONDITIONING AMPLIFIER ASSEMBLY (a) Connect the 3 connectors. (b) Engage the guide to install the air conditioning amplifier assembly. (c) Install the 3 screws. (d) Install the front floor carpet assembly with the 2 clips as shown in the illustration...
Categories
- Manuals Home
- Toyota Yaris Owners Manual
- Toyota Yaris Service Manual
- Speedometer, Odometer, Trip Meter and Trip Meter Selector
- Engine Start Function When Key Battery is Dead
- Brake System Control Module "A" System Voltage System Voltage Low (C137BA2)
- New on site
- Most important about car
Turning the Engine Off
Stop the vehicle completely. Manual transaxle: Shift into neutral and set the parking brake.Automatic transaxle: Shift the selector lever to the P position and set the parking brake.
Press the push button start to turn off the engine. The ignition position is off.